Immersive Environments: Advanced Audio and Lighting Control System
Developed by https_KingPie
Table of Contents
- Immersive Environments: Advanced Audio and Lighting Control System
- Table of Contents
- Summary
- In-depth Explanation
- Distinguishing Features of Immersive Enviornments
- Setting Up Immersive Environments
Summary
Immersive Environments (IE) is the successor to Truly Dynamic Lighting (aka TDL). Originally named Truly Dynamic Lighting 2, the focus of the project was shifted to overhaul the initial framework and direction of the system, while also meeting all of the current, anticipated, and potential needs of my current project. IE features all of the same settings as TDL, and also features a host of other new features, settings, and optimizations to expand developer creative control. The final product is a robust system that allows for time-based and region-based lighting and audio controls.
With IE you can create periods of time, such as
Within these periods of time, you can assign different settings for lighting and audio. IE also comes with advanced region controls, for creating different lighting and audio environments in specific regions. IE also features compatability with different weather profiles, which can also control the lighting and audio.
However, this barely scratches the surface of IE. Please continue reading for a more in-depth explanation of what sets IE apart from TDL.
If you would like to check out an example place with IE in action - click here
In-depth Explanation
Audio
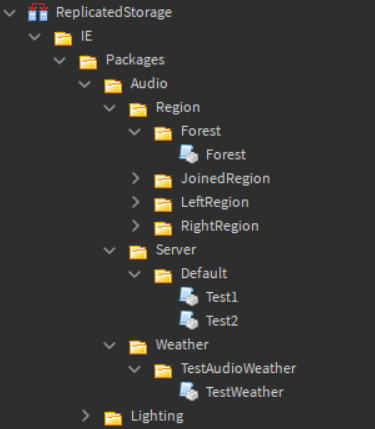
Immersive Environments utilizes a categorical audio definition system. Audio is split into four different categories: the SoundService, server sounds, region sounds, and shared sounds. The later two categories are only used for regions.
The SoundService is a built in service, but it is criminally under-used by developers. The SoundService allows for manipulations to AmbientReverb, which adjusts the ambient sound environment preset used, and other useful settings for controlling 3D sound. If you are not familiar with it, I highly recommend doing some research on why this service is a great tool.
Server sounds are sounds that the entire server can hear. An example of this is a nature ambience for a game that takes place in a forest.
Region sounds are sounds native to a region. An example of this are the sounds of background noise when entering a restaurant.
Shared sounds are sounds that are native to multiple regions. An example of this is a three room building, with music playing from a radio in one room. Using shared sounds, you can precisely tailor how loud the music of the radio or other actives sounds behave in each room. This is particularly useful while also combining SoundService manipulation (AmbientReverb in most cases).
While the lighting system is, in a broad sense, a class manipulation system - the audio system is tailored specifically for audio related instances. Instances in the class of SoundEffect are not currently supported, however, those may be added in at a later point to expand developer creative control. Audio behaves similarly to lighting, in the sense that you can control for different audio triggers, depending on time or region.
Implementing Randomization
The IE audio system also features a special category of random sounds. These random sounds are native only to regions, but allow for randomized sound generation. Developers can specify the frequency and chance of playing that a sound has. An example of this, is the sound of a gun being fired. By manipulating the frequency in which the sound might play and the probability that the sound actually does play, a truly unique environment such as a battlefield can be easily generated.
Lighting
Immersive Environments uses a class-based manipulation system that is tailored towards classes normally placed in the Lighting and Workspace services, as well as the Lighting service itself. However, it is set up to work with any class of instances
(Warning - it is expected that IE will be compatible with nearly all class properties, however, using it on untested class properties may result in errors! With this in mind, please note that any changes regarding classes that are children of the Lighting service are possible to use with classes of other services!)
Create different lighting settings, or profiles, depending on either time or region (more on this in the Time and Regions sub-sections). Here’s an example of how this might play out
Time based example
As the sun begins to set in-game, smoothly tween to new lighting settings by changing depth of field to reduce vision, adjust the color correction to a slightly more blue effect, and “turn on” torches by enabling fire, smoke, and a particle emitter for greater effect. At midnight, reduce the depth of field again, and make minor changes to lighting effects. Reduce the fire and smoke of the torch to visibly give the torch a life of its own. As morning creeps, extinguish the lights, make changes to the game’s sun rays to prepare for a bright and beautiful start to the new day. Ambitiously, (since IE is a class based manipulation system) have the doors of shops smoothly open as the business day begins.
Region based example
A player ventures into a local blacksmith’s forge. As they enter the house, the color correction shifts to become more orange and the blur increases because of the heat. Various furnaces begin to smoke as well. Once the player leaves this house, their lighting settings quickly resync to that of the server.
These are immersive environments.
IE also features unique lighting settings and capabilities that set it apart from other similar systems.
Randomization
In your lighting settings, you can create randomization for each instance affected. This is great for generating dynamic environments (ex: cities where 80% of the lights turn on at night).
Complex Instance Support
One of TDL’s strongest selling points was its ability to control complex instances (previously known/referred to as multi-instances). If you are not familiar, please imagine a lantern model. The lantern model might have an actual part (yellow and neon material), a participle emitter for effects, and a point light for providing light effects. IE allows you to fully control this complex instance by indicating a reference part, indicating the relationships of instances that you want changed (ex: siblings, children, descendants, parents, etc.)
Complex instances also support randomization, so you don’t have to worry about smoke appearing while the rest of the light is not on, or other weird situations.
Denote lights that are “on”
This is tougher to explain, so please refer to the time-based example above. Imagining that we have 200 torches (each with a 50% chance of turning on), we will have approximately 100 torches once night falls. When midnight comes, we only want to reduce the smoke and particle emitter properties of torches that are on. It would look strange if some suddenly sprang to life, and might ruin the effect. You can denote these torches as lights that are “on” within the settings of both periods so that lighting changes only affect lights that are “on” or that after a lighting period comes to pass, the lights are considered “on”. This can be applied creatively to generate unique game environments.
Regions
Regions are handled using VerdommeManDevAcc’s Object Tracker & Area Manager module. This allows for efficient and fast tracking of regions, with minimal performance impacts.
Side note: If you wish to change IE to a different module, check out the RegionHandling module and make changes there. It should be relatively straightforward.
IE uses smart checks to prevent region glitching and can handle overlapping regions, which greatly expands the creative potential of developers - particularly when paired with shared sounds.
Here’s an example of where this might be handy - when entering 3 regions that all exist within one another (imagine a giant house with different overlapping regions for the house itself, the floor you are on, and the specific room you enter), the settings for the most recently joined region are always applied. IE also tracks the order of regions that you have joined, so if you leave the most recent region (while remaining in the other two regions), IE will automatically adjust relevant lighting and audio settings to the next most recently joined region that you are still in.
Weather
Immersive Environments features a weather control system for developers to leverage. In a sense, the weather system can be thought of as manual triggers/overrides for the current lighting or audio cycles. IE separates weather into lighting and audio categories. This allows developers to mix and match weather settings easily. An example of this is having one lighting profile for a thunderstorm, but three audio profiles for the sound of thunder and lightning, to create variety.
Weather, by default, halts the cycle of either lighting or audio (depending on whether lighting-based or audio-based weather is active). Developers can control whether regions supersede active weather. For example, regions that are outdoors may seem unnatural if they are unaffected by weather. Regions that are indoors may have their effects ruined if their settings suddenly change, despite not being close to the outdoors at all.
Because weather mixes both lighting and audio, it is possible to generate custom events that are not inherently weather or climate related. Through tailored configuration, it is possible to generate fireworks displays, firestorms, sudden ambience changes for an environment like a club, etc.
Distinguishing Features of Immersive Enviornments
Easy Set-up
IE uses a simple modular setting system, and is designed for people with 0 programming experience. Compared to TDL, settings are now in a much more readable format to streamline editing, organization, and comprehension. Settings are created and read by the system by placing them in either ServerSettings (for settings that are native to the audio or lighting cycle), RegionSettings (for settings that are used for regions), and WeatherSettings (for settings that are used in the creation of weather)
Here’s an example of the simplicity of set-up
IE is designed to be simple to set-up and easy to understand.
Scalable to the Extreme
As mentioned above, IE is a class based manipulation system. While it is tailored to settings based around lighting and audio, the lighting system allows for the manipulation of any class of instances. By default, IE is set to work with instances in the workspace and lighting services, however, it is relatively simple to edit the system to expand its capabilities to include other services. If you’re not an extreme programmer, don’t fret. Experiment with different classes in the workspace and see what IE is able to do!
Compatible with CullingService custom streaming
Performance is always a critical concern for developers. Earlier in 2021, I wrote CullingService and have since adjusted for CullingService compatibility to be toggled on and off. This way, you can continue to maximize performance and retain full control of your game, without sacrificing performance or immersion factors.
Server Side or Client Side Settings
Lighting can be very tricky, especially when the server and client are simultaneously vying to control things. IE allows you to client side the entire system with the flip of a boolean (i.e. go to settings and set [“ClientSided”] to true - it’s really simple!) This is highly recommended (as it also required to enable region functionality), and is set by default.
The best part is that, even when IE is Client Sided, you still run it through the server! This allows you to track changes and automatically replicate lighting and audio settings to players without having to worry about complex remote functionalities!
Day/Night options
IE is bundled with a native Day/Night changer. It allows you to easily determine how many minutes (in real life) you want the length of a day to be. Unlike many other changers, it also allows you to have time pass differently during the day and the night. For example, if your game is a horror game, it might make sense to have 15 minute nights and 10 minute days. If you want your days and nights to progress at the same rate, that is possible as well.
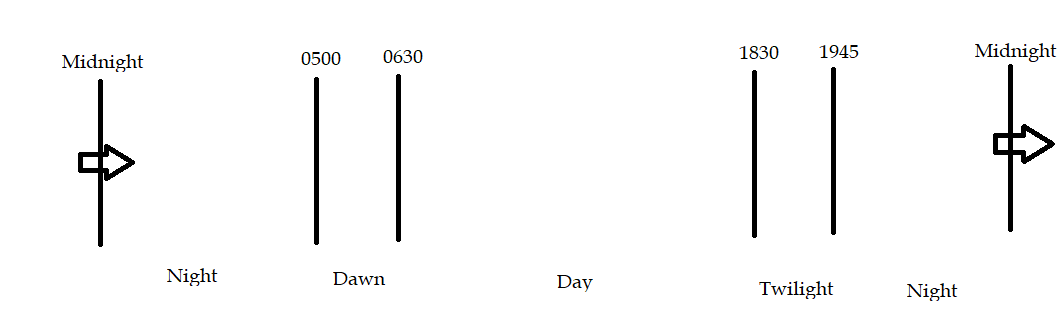
Auto Calculated Tween Starts
IE, like TDL, features a system that auto-calculates how fast time moves in your game (i.e. the speed of your Day/Night cycle) and will automatically adjust your audio and lighting periods so that the completion of the setting changes corresponds exactly to the beginnings of your audio or lighting period. This can be disabled as well.
Here’s why this is necessary.
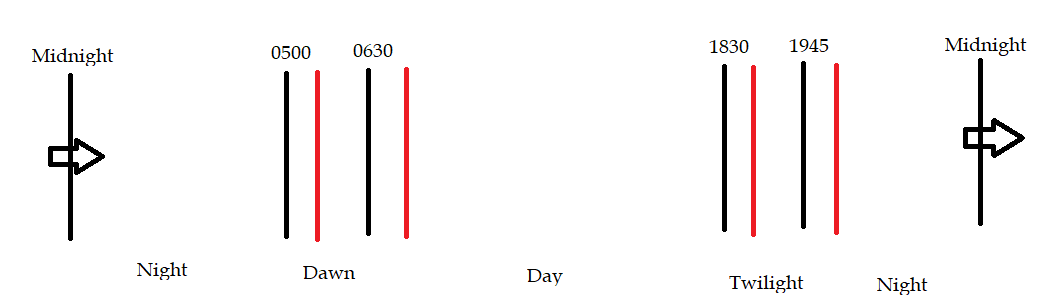
The black lines are the ranges of each lighting period and when we want those settings to be applied. The red lines are approximately where those settings are going to be applied if the tween starts at the beginning of the lighting period. This can result in Lighting Periods behaving as the developer does not intend
Auto-calculation solves this problem and ensures that your time based settings begin exactly where you want them to.
If you are using IE’s built-in day/night changer (which is recommended), then this conversion happens instantly. If you are not, IE will wait for a specified amount of time (this can be changed in settings) to measure the rate at which time passes in your game, and make the correction accordingly. Note: this will take a few extra seconds for IE to initialize, which is why the use of IE’s built-in day/night changer is recommended, as this allows the calculation to occur instantly.
Blazing Fast and Lightweight
IE is designed to load fast, get the job done, and do all of this with minimal performance impacts.
While running a test of IE in Roblox Studio, I was able to get >300 FPS, initialization tends to take around 9 * 10^-3 seconds, CPU usage remains low, and performance activity is low too.
IE offers different settings to enhance performance as well. Custom tailor the amount of time IE checks for changes to time, use sorted periods (optimized way of tracking time changes), and more to reduce (or increase) overhead as much as you like.
Fully Customizable
Besides customizing your audio and lighting regions, server, and weather settings, you can also customize a host of other settings. They are listed below
Internal Settings can also be found in the the source code. They are not listed, because most people will not find them useful.
Simple API
The API for Immersive Environments was designed with non-programmers in mind. Below are the only functions that you need to ever worry about. Call all of these from the server, no matter what. Everything else runs automatically.
Note:
- PackageName is the name of whatever your package is (this will be the folder name under Packages)
- PackageType is always either “Audio” or “Lighting”
- All API should be called from the server, with the exception of Main:Run() which should be called once from both the server and client
Main
Main:Run()
This starts IE and should be the first function called. Call this before interacting with anything else in the API.
Main:SetServerPackage(PackageType: string, PackageName: string)
This sets the server package.
Main:SetWeatherPackage(PackageType: string, PackageName: string)
This sets the weather package.
Main:ClearWeather(PackageType: string, PackageName: string)
This clears the weather package.
Setting Up Immersive Environments
- Head over to the src branch of the GitHub. This can be found here
- If you are using Rojo, you can port the files over as they are
- If you are using Studio, download the files from the Roblox Library here
- When setting up audio and lighting time settings make sure that every time is covered. Do not allow any gaps ex: 4-5, 6-7, etc. it must be continuous like 4-5, 5-6, etc. or IE will break. If you want to have one setting for everytime, just set both the StartTime and EndTime to 0.
- For examples on how to set up settings, check the Example Place.
Your set-up code should look like: Server:
local ReplicatedStorage = game:GetService("ReplicatedStorage")
local IEFolder = ReplicatedStorage.IE
local IEMain = require(IEFolder.Main)

IEMain:Run()
IEMain:SetServerPackage("Audio", "Default")
IEMain:SetServerPackage("Lighting", "Default")
--// This assumes you have two packages, one audio package called “Default” and another lighting package called “Default”
Client:
local ReplicatedStorage = game:GetService("ReplicatedStorage")
local IEFolder = ReplicatedStorage:WaitForChild("IE")
local Main = require(IEFolder:WaitForChild("Main"))

Main:Run()
IE will begin running automatically - no further setup is required